- Published on
Installing Seahorse, Anchor and Solana
- Authors

- Name
- Lostin
- @__lostin__
Up until now, our tutorials have been using Solana Playgrounds which is the easiest way to get started with Solana and Seahorse development. With Playgrounds you can be up and running very quickly, the installations have been abstracted away making it IMO the best place to start. However at some point we need to take the training wheels off and graduate into using a more professional set up for Seahorse and Solana development which will allow us to do more. So today's tutorial we'll be installing Seahorse.
I will walk you through the process of installing through Github Codespaces. Why Codespaces? Well the big advantage is its replicability, codespaces offers the same envirnoment for everyone reading. It will work the same for you regardless of your device's OS, Mac, Windows or Linux. It's common to run into frustrating issues when installing lots of packages that depend on one another and many of these error messages will be unique to your local environment. Codespaces gets around this. Once you've gone through the process once on Codespaces, you should be a lot more confident to also install on your local device. But it's also quite possible to just use code spaces especially early in your journey as a Solana Seahorse developer.
Codespaces
I'm going to assume you have a Github account already set up. Firstly let's fork the Seahorse repo you can find it here
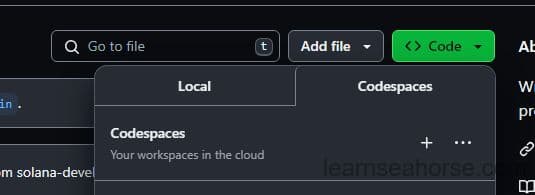
The option to open up a Codespace can be found in the dropdown menu for the 'Code' button. It will take a few seconds to load up an instance of VS Code running on a Linux server right in your browser window. If you've activated it correctly, the terminal should give you a welcoming message something like this:
👋 Welcome to Codespaces! You are on our default image.
   - It includes runtimes and tools for Python, Node.js, Docker, and more. See the full list here: https://aka.ms/ghcs-default-image
   - Want to use a custom image instead? Learn more here: https://aka.ms/configure-codespace

🔍 To explore VS Code to its fullest, search using the Command Palette (Cmd/Ctrl + Shift + P or F1).

📝 Edit away, run your app as usual, and we'll automatically make it available for you to access.
Our installation process will look something like this Rust > Solana > Anchor > Seahorse. Each level builds on from the next. Seahorse needs Anchor, Anchor needs Solana, Solana needs Rust. Technically Yarn is also needed, but Codespaces come with Yarn pre-installed.
Rust
Rust is the foundation upon which everything, including Seahorse, sits upon. You can find the install instructions for Rust here. As you are in a cloud environment probably best not to use the download binaries, try copy and pasting the curl command into the terminal. Follow the instructions and it shouldn't take long before you see a similar message to this.
Rust is installed now. Great!

To get started you may need to restart your current shell.
This would reload your PATH environment variable to include
Cargo's bin directory ($HOME/.cargo/bin).

To configure your current shell, run:
source "$HOME/.cargo/env"
Either restart the shell or run source "$HOME/.cargo/env" so the command line now recognizes Rust has been installed. Run rustc --version, the command line should print the version of Rust you have installed.
Solana Tool Suite
Next we install the Solana tool suite for Rust. You can find this here. Again running the curl command is probably easiest. When you're done you should see something like this below.
downloading v1.17.10 installer
  ✨ 1.17.10 initialized
Adding
export PATH="/home/codespace/.local/share/solana/install/active_release/bin:$PATH" to /home/codespace/.profile

Close and reopen your terminal to apply the PATH changes or run the following in your existing shell:

export PATH="/home/codespace/.local/share/solana/install/active_release/bin:$PATH"
Restart the shell or run export PATH="/home/codespace/.local/share/solana/install/active_release/bin:$PATH" to add Solana to the path. Check Solana is installed correctly by running solana --version.
Anchor
Now for the big one Anchor. This install will take the longest. Anchor is a framework that makes working with Rust to build for Solana much easier. Seahorse is built on top of Anchor, it takes your python code and compiles it down into an Anchor program written in Rust. We'll look at this in more detail in another tutorial. The official instructions to install Anchor can be found here.
As of writing, the current version of Anchor is 0.29.0. Change the commands below the reflect the current version at the time of your install.
$ cargo install --git https://github.com/coral-xyz/anchor avm --locked --force
$ avm install latest
$ avm install 0.29.0
$ avm use 0.29.0
The final message you see after installing Anchor should be something like this:
Summary Successfully installed anchor-cli, anchor-cli!
warning: be sure to add `/home/codespace/.avm/bin` to your PATH to be able to run the installed binaries
Now using anchor version 0.26.0.
Restart the shell or run export PATH="/home/codespace/.avm/bin:$PATH". Check Anchor is installed correctly by running anchor --version.
Seahorse
Finally time for Seahorse. Scargo install seahorse-dev.
Installing /home/codespace/.cargo/bin/seahorse
Installed package `seahorse-dev v0.1.1` (executable `seahorse`)
Double check there's no issues. You should be able to run the following 4 commands rustc --version, solana --version, anchor --version, seahorse --version. If they all run without error you're good to go! Click on the hamburger menu icon in the top left corner and find the save workspace as... option. Save the workspace under a name (e.g. Seahorse apps).
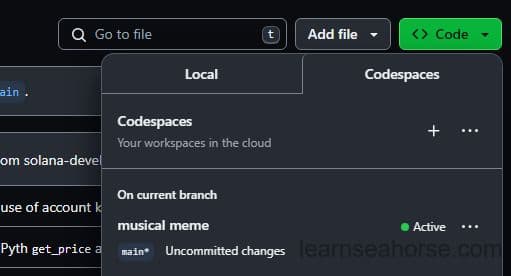
Now the moment of truth. Close the window. Go back to your forked Github repo. In the Code dropdown options you should now see your new code space. Select it and wait for it to load up. Again, check the Rust, Solana, Anchor and Seahorse versions are all installed and recognized. If not add them back to the path with the appropriate export PATH="" command.
In this tutorial we covered the necessary steps to set all the packages you need for Solana development with Seahorse. Congrats, you're ready for the big time!