- Published on
Hello World Tutorial, Your First Seahorse Solana Program
- Authors

- Name
- Lostin
- @__lostin__
In this tutorial we’ll cover the simplest possible way to get your first Seahorse program out the door. We all have to start somewhere right. First go to Solana playgrounds. Solana Playgrounds is a popular browser based IDE for developing on Solana. You can think of it as VS Code in a browser for Solana. Using Solana Playgrounds also means you don't need to install Rust, Anchor or Seahorse locally!
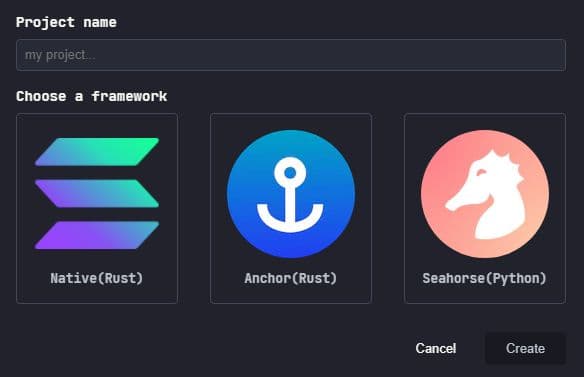
Start at the top right and select “+ Create a new project”

Give your project a name. Something like 'hello world' should do. In the popup, choose Seahorse (obviously!)
Now on the explorer tab on the left, you should see the name of your project and a Python file. File explorer with directories should be on the left and code on the right as is common to most modern IDEs.
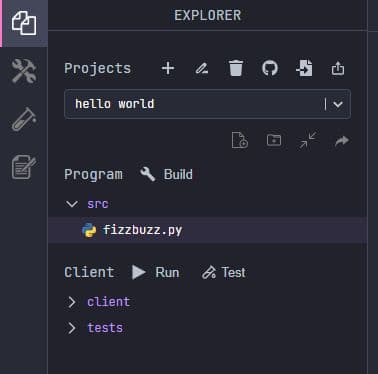
A sample demo file will be set up for you already, rename this file from fizzbuzz to something more appropriate like ‘hello_world.py’. Delete all the boilerplate code so we can start fresh.
Wallet Setup
Type ‘connect’ into the command line shell at the bottom on the webpage. A pop up should appear:
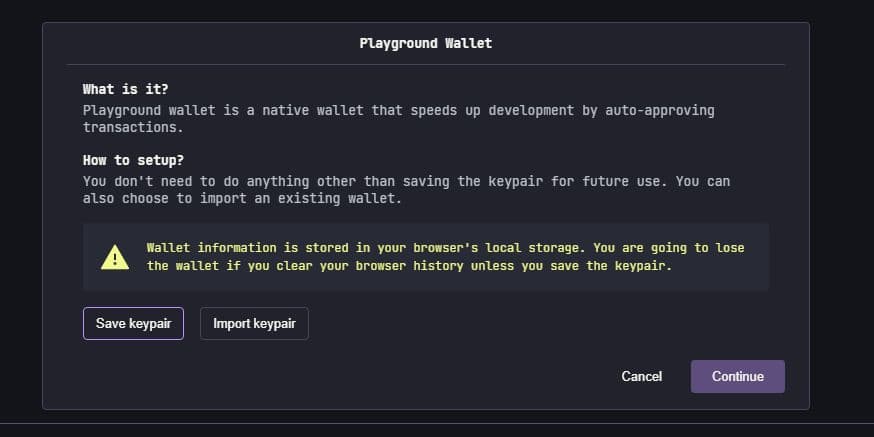
Select ‘save keypair’ and continue. We’ll deal with the warning later. Next type ‘solana airdrop 2’ into the command line. You should have 2 SOL airdropped into your wallet.
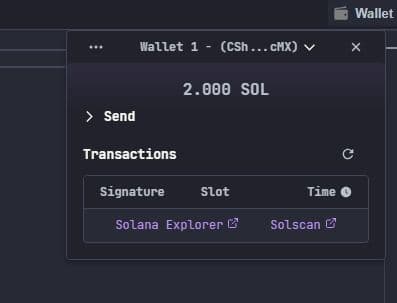
You can find your wallet in the top right corner.
Code
First thing we do with any Seahorse project is to import the Seahorse library.
from seahorse.prelude import *
Then we declare our ID.
declare_id('11111111111111111111111111111111')
These 32 ones are a placeholder for your programs’ public key. Playgrounds will change this automatically to a real public key when we build the program. Next we add our first function!
@instruction
def hello(signer: Signer):
    print('Hello, World!')
@instruction is a Python decorator, you might be familiar with these already from frameworks like Flask or using the @cache decorator. The function takes one argument ‘signer’ of type Signer. We don’t need to declare the type of Signer, it comes from the Seahorse import.
This “signer: Signer” structure in Python is known as type hinting. It’s a way for us to declare the type of an argument. e.g. hello(name: str) or add(x: int, y: int). Most Python code is written without type hints but in Seahorse we need them. They’re easy to understand so don’t worry if you’re not used to using them.
Okay, that's it for writing code. Let’s compile the code into something we can deploy onto Solana. Select the tools icon in the top left corner.
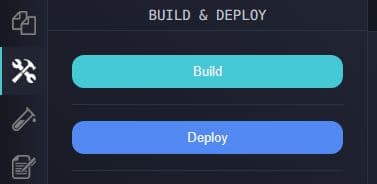
Select ‘Build’. You should see a message on the command line saying ‘Build successful’. Next press the ‘Deploy’ button. You’ll need to wait a little while for this process to finish. Once complete a popup should provide you with some links to view your program on a block explorer like Solscan.
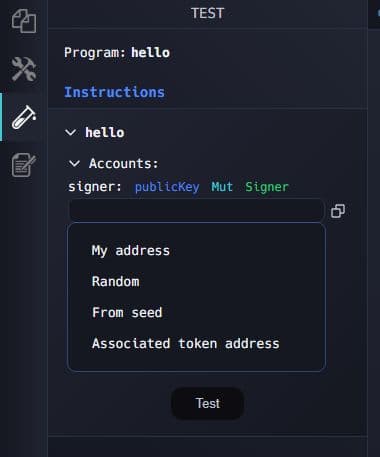
Next click on the cog in the bottom left corner and select ‘Show transaction details’. This will allow us to see the print statement from our hello world function.

Next we want to test our program. Select ‘hello’ and in the singer box dropdown select ‘My address’ and then ‘Test’.
You should see in the log messages, something like this:

Congrats, you’ve built, deployed and interacted with your first program on Solana, all in Python. Every journey starts with a first step.
The sequence of:
- Code
- Build
- Deploy
- Test
Is something we’ll go through again and again with developing Solana programs using Seahorse.