- Published on
Poll App Tutorial, Your Second Seahorse Solana Program
- Authors

- Name
- Lostin
- @__lostin__
Welcome back. This tutorial follows on from the previous hello world example. If you don't have a wallet set up already, or have never used Solana Playgrounds before, check the previous tutorial.
We'll be making a very simple poll program which stores votes today. So firstly create a new project at the top left corner, delete the boilerplate code and rename the .py file to something appropriate like 'poll_app.py' import Seahorse and declare a placeholder ID.
from seahorse.prelude import *

declare_id('11111111111111111111111111111111')
Let's create a class to represent our poll and add 3 options, 'ethereum', 'solana' and 'polygon'. This class will be derived from Seahorse's base 'Account' class.
class Poll(Account):
  ethereum: u64
  solana: u64
  polygon: u64
u64 here stands for 64 bit unsigned integer. Unsigned means it cannot have a - negative sign, i.e. it cannot be negative. Which makes sense, since we can't have a negative amount of votes! 64 bit refers to the maximum size of the integer (2^64). In vanilla Python integers are unbounded and super easy to work with. With Seahorse we need to be more precise and declare the type of an integer.
Next up we can add an 'instruction' for initiating the poll. Much like you would __init__ a class in vanilla Python. You can think of an instruction as representing a transaction that can be executed on the blockchain. So a user can execute this instruction to create a new poll.
The instruction function has 2 parameters, the poll and the user. The poll is a new empty instance of the Poll class and the user which is of the type Signer.
We initialize the poll by calling poll.init(). This requires an account to pay some SOL. We specify this with the c payer=user i.e. the current user is the one paying to set up the poll.
@instruction
def create(poll: Empty[Poll], user: Signer):
    poll = poll.init(payer=user)
Our second instruction will be to allow accounts to vote in the poll. The vote instruction takes 3 arguments. The user user: Signer the instance of the poll they wish to vote in poll: Poll and how they wish to vote vote_op: str. The body of the function is a simple if / elif / else set up.
@instruction
def vote(user: Signer, poll: Poll, vote_op: str):
    if vote_op == "ethereum":
        poll.ethereum += 1
    elif vote_op == "solana":
        poll.solana += 1
    elif vote_op == "polygon":
        poll.polygon += 1
    else:
        print("Candidate does not exist")
Final code
Our final program should look something like this:
from seahorse.prelude import *


declare_id('11111111111111111111111111111111')


class Poll(Account):
  ethereum: u64
  solana: u64
  polygon: u64


@instruction
def create(poll: Empty[Poll], user: Signer):
    poll = poll.init(payer=user)


@instruction
def vote(user: Signer, poll: Poll, vote_op: str):
    if vote_op == "ethereum":
        poll.ethereum += 1
    elif vote_op == "solana":
        poll.solana += 1
    elif vote_op == "polygon":
        poll.polygon += 1
    else:
        print("Candidate does not exist")
Now let's build it. Select the 'Build & Deploy' icon in the top left corner. The command line shell should display something like this Build successful. Completed in 4.32s. We can deploy our program by selecting the deploy button, make sure you have enough SOL in your wallet. It's common for the deploy process to take a minute or so after which you will see another message on the command line similar to Deployment successful. Completed in 55s..
Initialise and Export the IDL
IDL stands for Interface Definition Language (IDL). It's a small JSON file that let's other people and programs know how to interact with your program. An IDL lays out the public interfaces for your instructions.
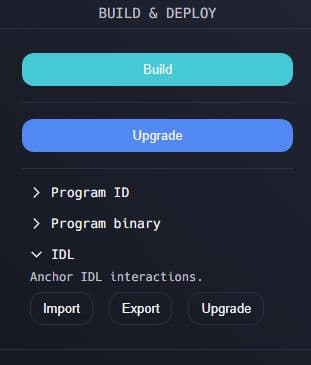
The option to create an IDL can be found in 'Build & Deploy'. Simply select 'Initialize' which will create the IDL on devnet, you should see a message on the command line similar to this IDL account created: ******. Select 'Export' from the options. It should save a JSON file to your downloads folder. The file should look something like this below. You can see it doesn't contain our logic, instead it lists what is needed to interact with our program.
{
  "version": "0.1.0",
  "name": "poll",
  "instructions": [
    {
      "name": "create",
      "accounts": [
        { "name": "poll", "isMut": true, "isSigner": true },
        { "name": "user", "isMut": true, "isSigner": true },
        { "name": "rent", "isMut": false, "isSigner": false },
        { "name": "systemProgram", "isMut": false, "isSigner": false }
      ],
      "args": []
    },
    {
      "name": "vote",
      "accounts": [
        { "name": "user", "isMut": true, "isSigner": true },
        { "name": "poll", "isMut": true, "isSigner": false }
      ],
      "args": [{ "name": "voteOp", "type": "string" }]
    }
  ],
  "accounts": [
    {
      "name": "Poll",
      "type": {
        "kind": "struct",
        "fields": [
          { "name": "ethereum", "type": "u64" },
          { "name": "solana", "type": "u64" },
          { "name": "polygon", "type": "u64" }
        ]
      }
    }
  ]
}
If you check the block explorer link for your deployed program on devnet, you should be able to poke around and find the IDL information listed there also now that it's been initialized.
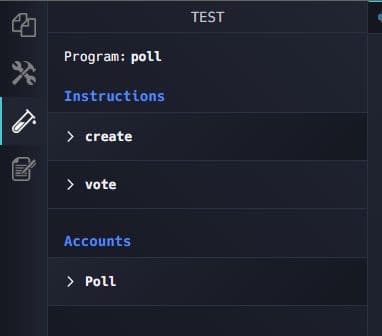
Testing
Time to test our program. Does it actually work the way we think it will? Select testing from the options on the top left. We should be able to see our two instructions and Poll account listed.
First we'll test 'create'. From the drop down menus select 'random' for poll and 'my address' for user.
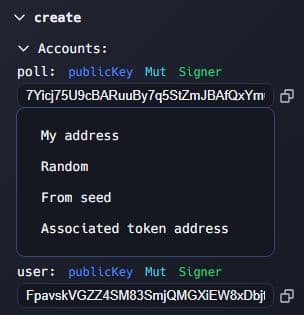
Select 'Test'. You should see a bunch of information being printed out on the command line. A link for the transaction should also be available if you want to look that over on the block explorer.
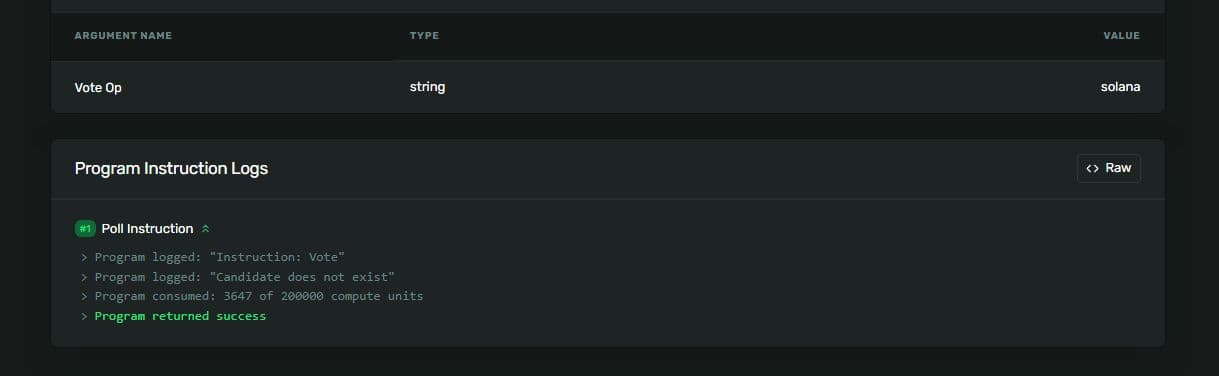
Next we test the poll instruction. In 'voteOp' enter solana without quotation marks. From the drop down menu select 'my address' for the user, for the poll, copy and paste the poll value from the previous create test. Finally select 'Test'.
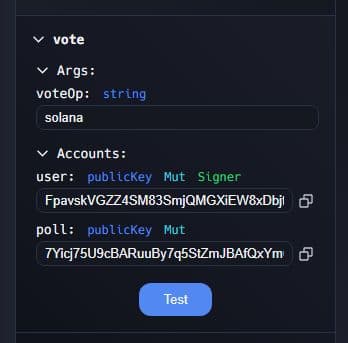
Again you will see a bunch of information being printed out on the command line. A link for the transaction should also be available.
Remember the only options in this poll are 'solana', 'ethereum' and 'polygon'. If you type anything else in the 'voteOp' field, the vote won't go through and instead there will be a message in the program instruction logs Program logged: "Candidate does not exist". You will be able to find this on the block explorer link if you scroll around. See example below:
Try voting several times and then checking the poll address on the block explorer. You should be able to find the poll data being stored on the blockchain.
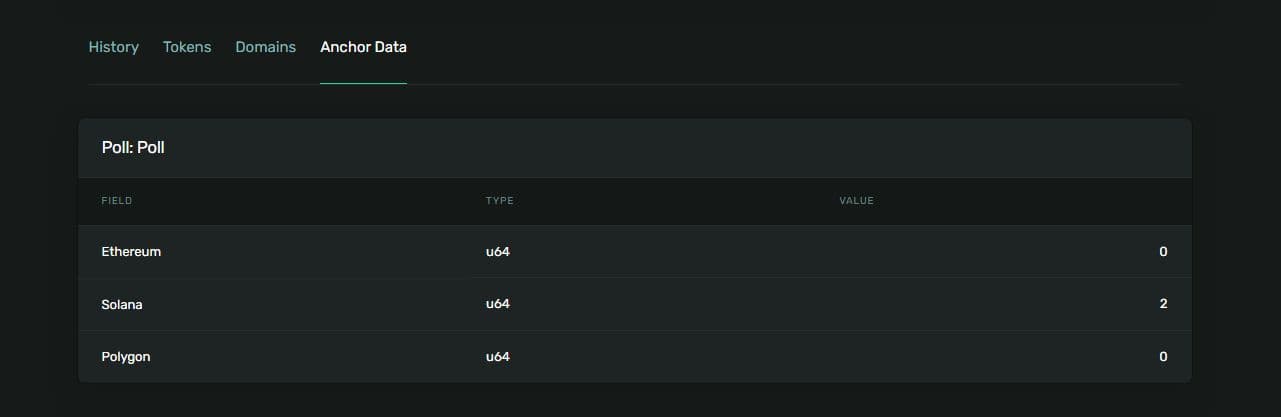
Pretty cool! You can think of the Solana blockchain as a globally distributed database. Storing our poll data here acts as our backend database source of truth. The poll results can be queried in real time by anyone including multiple different front ends and block explorers.
Congrats for making it this far. Your second Seahorse program has been deployed!